Delinea to Azure Key Vault Syncing
Purpose
The goal of synchronizing Delinea with Azure Key Vault are as follows:
- Allow simpler secrets management and rotation. For secrets that are managed by third parties (e.g. SQL server passwords, API keys), Children's National uses Delinea to host and manage access to secrets. This allows resource owners to regularly or automatically update passwords on applications. By performing synchronization, the updated passwords can be pushed up to Azure Key Vault for use by Enterprise Cloud resources without for manual copy-pasting. They can even be pushed to multiple Key Vaults from Delinea, further reducing manual effort.
- Create backups of secrets. Secrets that were managed in Key Vault previously now have the ability to remain in Delinea and be pushed up to new Key Vaults as needed. In the case of a loss or need to recreate secrets in a Key Vault, Delinea can be used to securely store them while they are changed over.
Overview
This guide assumes you are familiar with using Delinea, Azure Key Vault, Entra applications, and RBAC.
Part 1: Registering a Delinea-interfacing Application
- Log into https://portal.azure.com
- Activate any relevant roles you may have in Privileged Identity Management (PIM)
- In the search bar, type "App Registrations" and click the page.
- Either create an application or choose one we have from the list. We are currently using "Delinea Secret Server Azure Integration".
- On the side, click "Manage" and then "Certificates & secrets"
- Click the "Client secrets" tab and then "New client secret"
- Copy the Secret ID and Value.
Warning
Remember to copy the Value! You will not be able to see it again without recreating the client secret.
Part 2: Assigning Role-based Access Control (RBAC) and Firewall Rules
- Search for the Key Vault you want to sync with Delinea and go to its Overview page
- Click "Access control (IAM)" on the left side
- Click "Add" and "Add role assignment"
- Search for "Key Vault Secrets Officer" in the list of roles and click on it. Then click "Next"
- Click "Select members" and choose the name of the app that interfaces with Delinea. For us, it should be "Delinea Secret Server Azure Integration". Then click "Select" and then "Review + assign"
- On the final page, look over all the information, then click "Review + assign"
- Click "Settings" and "Networking" on the left side
- In the Firewall section, add the following two IP ranges:
20.228.138.112/29(Delinea egress)52.190.184.16/29(Disaster Recovery)
Part 3: Linking Secret Server to Azure
- Log into https://cnh.delinea.app
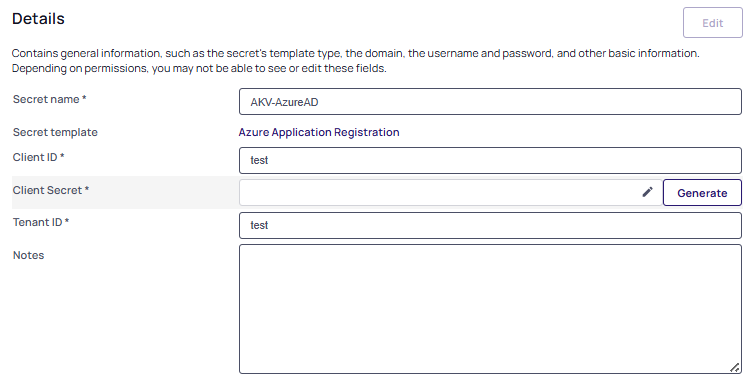
- Create a secret with the Azure Application Registration template:
- Secret Name: Follow the naming guidelines.
- ClientId: Copy the Secret ID from the Azure app secret
- ClientSecret: Copy the Value from the Azure app secret
- Tenant ID: Copy the Tenant ID from the Azure subscription. You can find this by searching for "Tenant properties" in Azure.
- Site: Keep the "Default" value
Part 4: Creating an External Vault Link
- On the left, hover over "Secret Server" and then click "External secrets" in the list
- Click "Create external vault link":
- Type: Azure Key Vault
- Credential Secret: Choose the name from the list of the secret created in the previous part
- Input type: Click "Automatic List" and choose the Key Vault(s) you need from the list
- Sync the vault to pull the names of secrets down into Delinea
- You can use the "External secrets" page from before to view a list of these secrets, but the filter must be set to "Synchronization: All states" to see them as the secrets will not be linked to Key Vault initially
Sources: