
Azure AI Search
Overview
Azure AI Search can be both classic and/or Retrieval Augmented Generation (RAG). The service sits between your frontend and your data, servicing requests and responses. All features integrate with LLMs to provide natural language queries and responses.
flowchart LR
 A[Client App] <--> B[Azure AI Search]
 B <--> C[Raw Data]
Classic Search
This can be thought of as LLM-free search. It is what most people think of when it comes to searching documents based on text matching and similarity. Returned documents are ranked by importance and relevance.
Vector Search
Vector search involves taking searchable text, breaking it into smaller chunks, and transforming those chunks into numerical representations called vectors in a process called embedding. During a search, the user's query is embedded into a vector and compared to existing vectors that correspond to text. The advantage to this is that closely related terms that don't exactly match letter-by-letter (e.g. flu vs. influenza) will also appear in the results. You can also use vector search to perform multimodal search over images, video, and speech since those can be first transformed into text before being embedded.
Hybrid Search
Both classic and vector search are separately running engines, but you can also do a hybrid of both. The hybrid search runs classic and vector search simultaneously and combines the results using Reciprocal Rank Fusion.
Indexing
The indexing process involves translating documents into searchable text that are stored in an index (the AI search equivalent of a table). You can use a schema definition to set rules for ingesting the data properly and validate the types are compatible with the service. The data ingestion process transforms your data into the appropriate schema/format for the index.
An index contains search documents which are units of searchable text (the AI search equivalent of a row). An applicable example for our scenario is our Archer policy set. Each unique Archer policy corresponds to a single search document.
Warning
Azure AI Search relies on JSON to index documents. You will need to transform your data sufficiently to make it compatible with the JSON specification. Make use of the available importers to accomplish this (see below).
Schemas
A schema consists of fields (the AI search equivalent of a column) that specify a data type and name for elements of your data. Fields can also have certain features applied which determine their behavior as part of search:
- Searchable: Can find via text or vector search. Text will be broken into tokens (words/search terms like "blue bunny" --> "blue" + "bunny")
- Filterable: Can be used in
$filterqueries (e.g.price ge 60 and price lt 300). Text does not get broken so only whole phrases match ("blue bunny" --> "blue bunny" ✅, "bunny" ❌) - Sortable: Can be used to order documents numerically, by time, or alphabetically. Collections of text (arrays of strings) are not sortable
- Facetable: Pronounced "facet"-able. Allows aggregate statistics like "documents in a domain" or "hotels in a city"
- Key: Unique identifier for a document. Must be typed as a string
- Retrievable: Whether the field can be returned as part of a search result. If set to false, it can still be used for adjusting the ranking and scoring of search results
Each field has a differing impact on the size of the resulting index. The "filterable", "sortable", and "facetable" fields will need extra storage to store full text that hasn't been tokenized. The size of an index can be checked using a GET INDEX request or by checking on Azure Portal.
Fields can be added at any time, but can't be updated or deleted. To do that, you must create a new index and delete the old one. As such, it's better to use code instead of the Azure Portal to create indices. Keep in mind that whatever code framework you use may have different defaults for field definitions.
Indexes become available immediately, but are not fully complete until all documents have been ingested. The time for this varies depending on the size of your data.
Schema Checklist
- Choose a column in your data to serve as the primary key or ID (Ex. UUID, movie_name)
- Key must be a string, not an integer or BigInt
- Key values won't be generated automatically unless you use a custom indexer to import data
- New documents will be added and old documents will be updated using this key, so make sure it's consistent!
- Max length of 1024 characters
- Ensure your data follows the Azure AI Search schema format
- This includes naming conventions, data types, and the document key requirements
- Provide a description of the index (up to 4000 characters)
- Pick which fields contribute searchable content or can be used for filtering results
- Nonvector content consists of string fields that can be queried from full text search
- See Schemas for more information on attributes you can apply to fields
- Choose an analyzer for nonvector fields
- The default is good enough unless you have special characters
- Pick which fields contribute vector content and must be embedded
- Vector content consists of mathematical representations of images and text that can be queried from vector search
- You also have to add which algorithm to use for embedding
Warning
In most cases, fields cannot be changed after the index has been created. The recommendation is to create an alias whose name does not change, but points to an index whose names and fields may change over time.
🪄 Import Setup (Wizard)
Wizard Overview
We need to use the Import data (new) feature to take advantage of the ability to create Retrieval Augmented Generation (RAG) systems more easily. This requires a connection to an Azure AI Foundry that has both an embedding (ex. text-embedding-3-large) and chat model (ex. gpt-5-mini) already set up. For our purposes, it is strictly better than the basic "Import data" feature as it supports a wider selection of Azure resources (such as SharePoint and OneDrive) and can be used to create vector indices. A full list of supported features and supported data is available in the documentation.
The import wizard will go through and automatically set up the following resources:
- Data Source: A connection to an Azure resource capable of interacting with an indexer. Examples include Azure Blob Storage, Azure Table Storage, Cosmos DB, and SharePoint
- Indexer: A job that is capable of querying a data source for documents and ingesting them into an index on a regular basis to maintain synchronization
- Index: A set of documents organized into a tabular format that contain searchable text
- (Optional) For Retrieval Augmented Generation:
- Skillsets: A set of sequential functions (called skills) that are capable of performing an automated action on a document. They are useful for things like reading PDFs with images, chunking large bodies of text, or mapping fields to each other. Usually, they are attached to an Indexer. Azure offers some basic skills for free, but complex ones require connection to an AI Foundry to get access to vision and speech-based tools.
- Knowledge Source: Either a direct connection to a Data Source or a storage location for holding the output of running AI skillsets on a Data Source (via an Indexer). Required to create a Knowledge Base
- Knowledge Base: A frontend capable of interacting with (multiple) Knowledge Sources to perform search. Can include a connection to an LLM for designing queries and synthesizing answers
Walkthrough
This process assumes you have the correct access to Azure AI Search (you are a Search Service Contributor or other higher role).
Let's walk through an example of how to use the import wizard. For this, we will assume that you have PDF documents that need to be searched that may or may not contain images. A good example for us is our bank of regulatory standards for which we comply as per the DC, Maryland, and Virginia Health offices. You can find them at our intranet site.
You will need:
- An Azure AI Search instance
- An Azure Storage Account
- A Blob Container within the Storage Account
- PDF documents to upload
- An Azure AI Foundry instance
- An embedding model in Foundry for creating vectors
- A chat model in Foundry for formulating responses
Part 1: Initialization, Networking, and Permissions
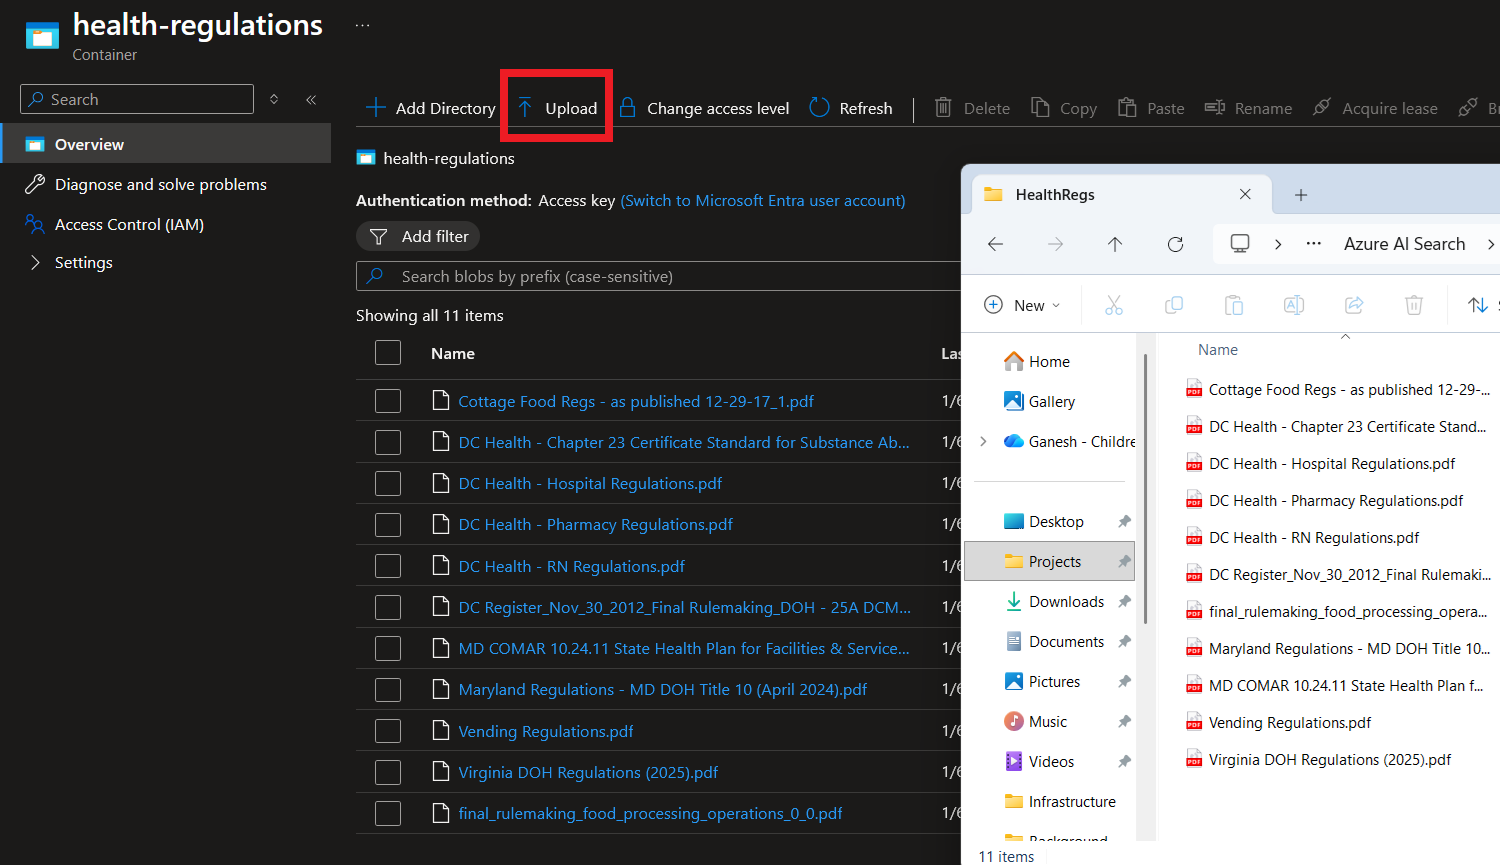
- Start by uploading your documents to a Blob Container in the Azure Storage Account you have provisioned:
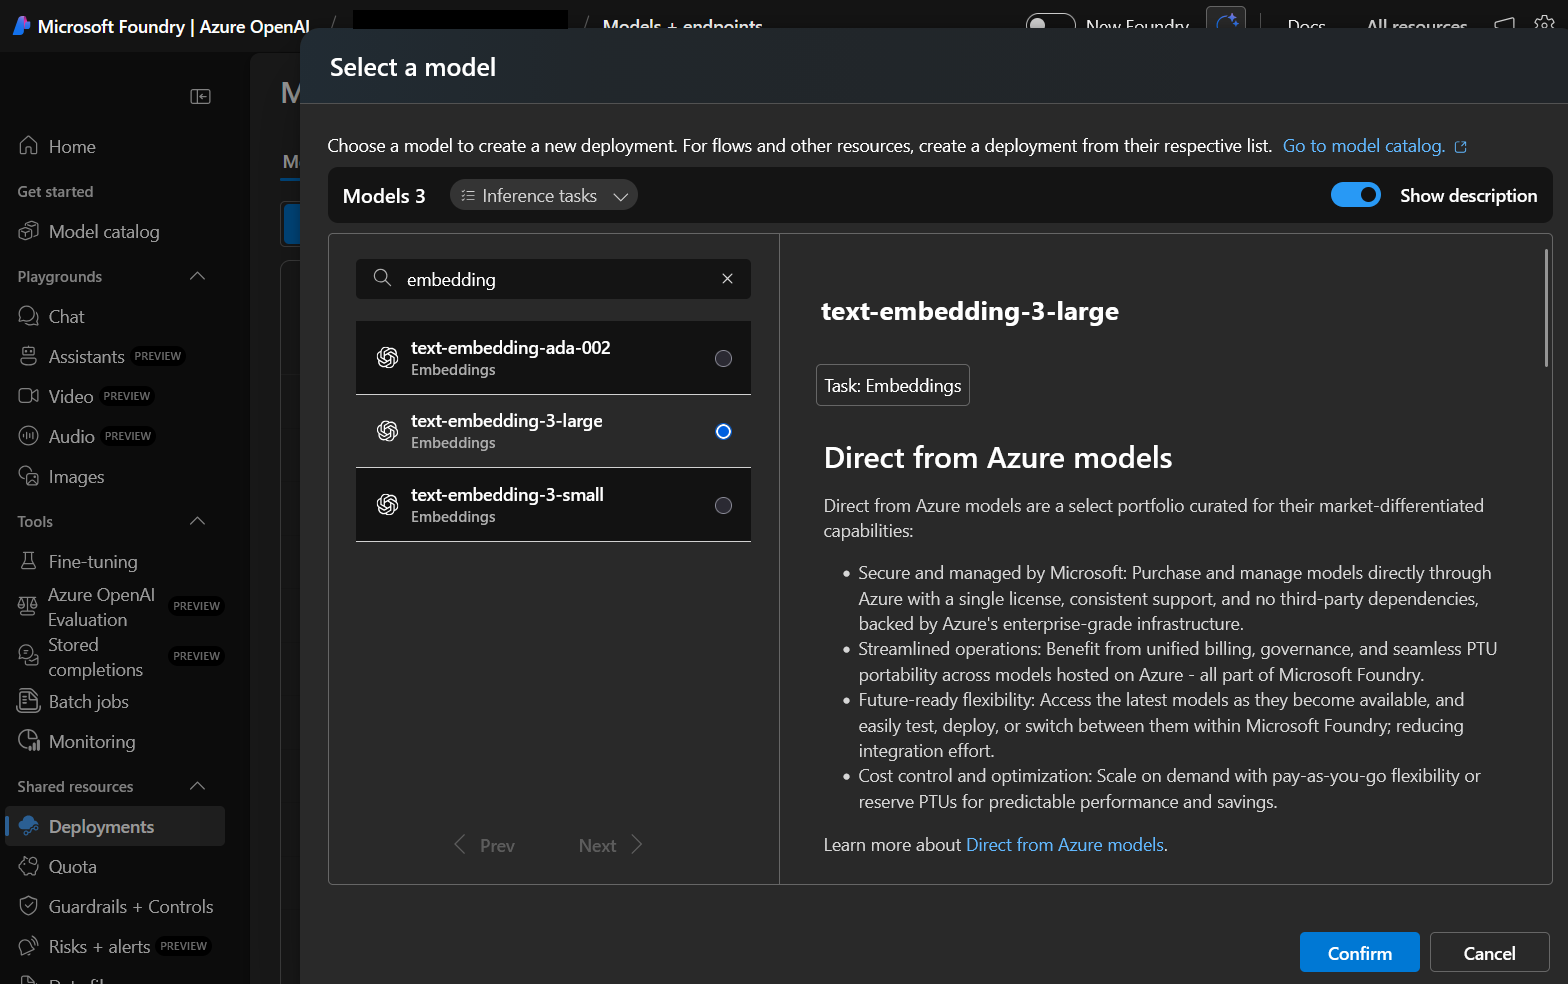
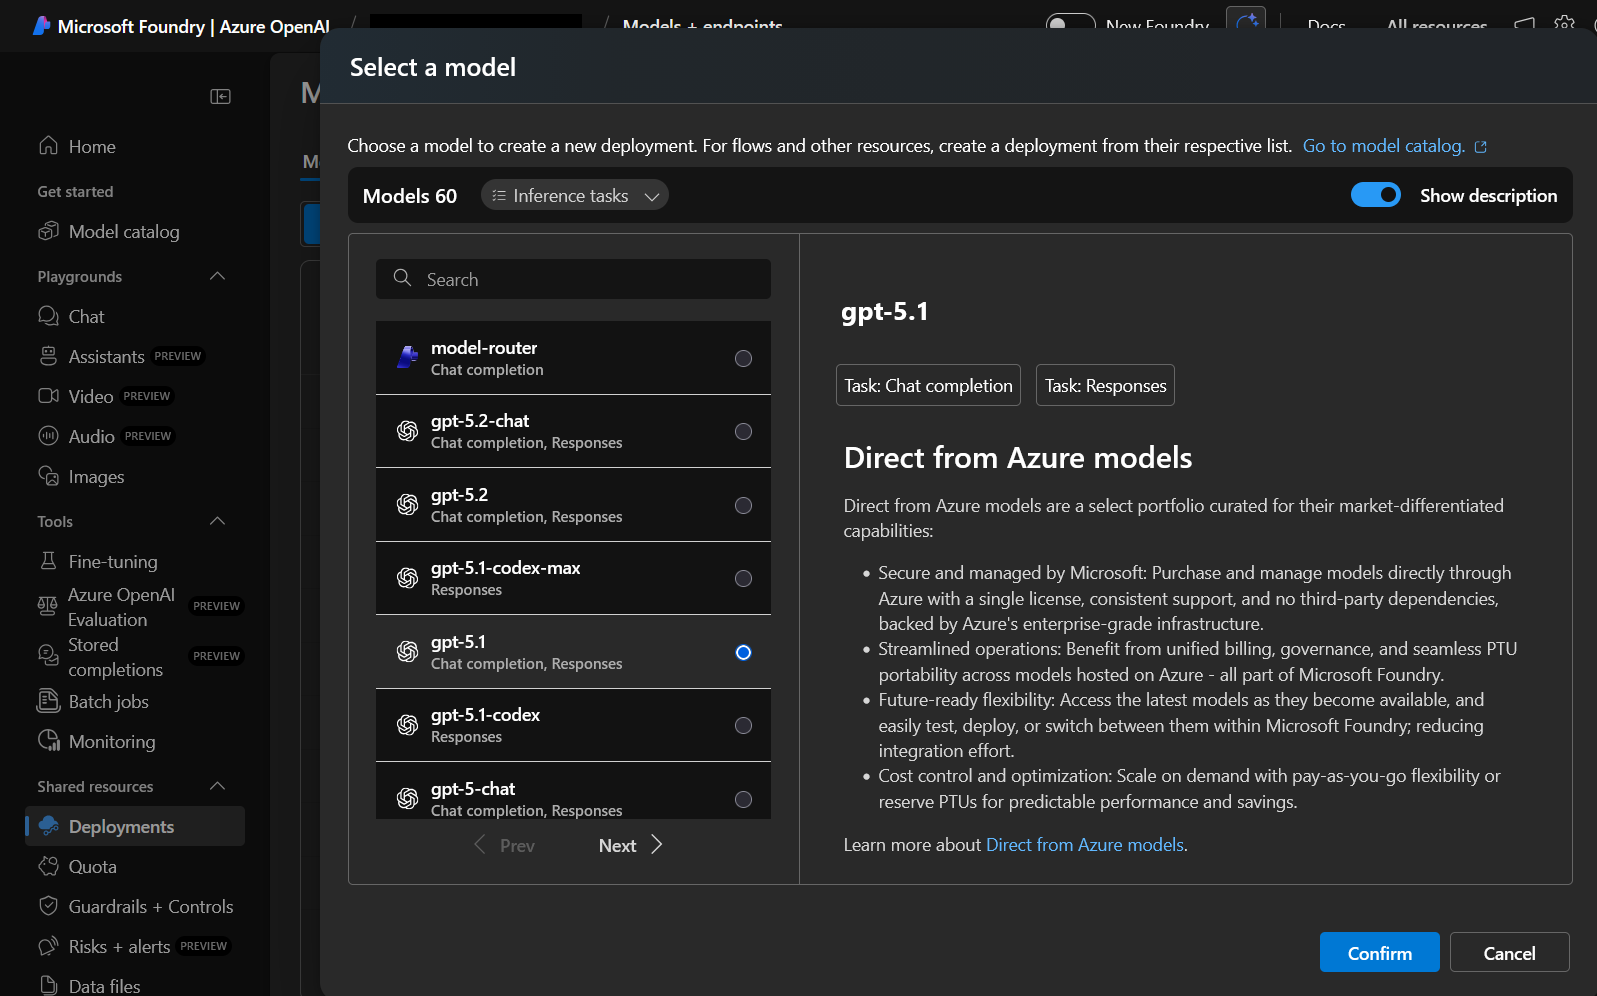
- Create two model endpoints in your Azure AI Foundry:
- A text embedding model:
- A chat model:
- A text embedding model:
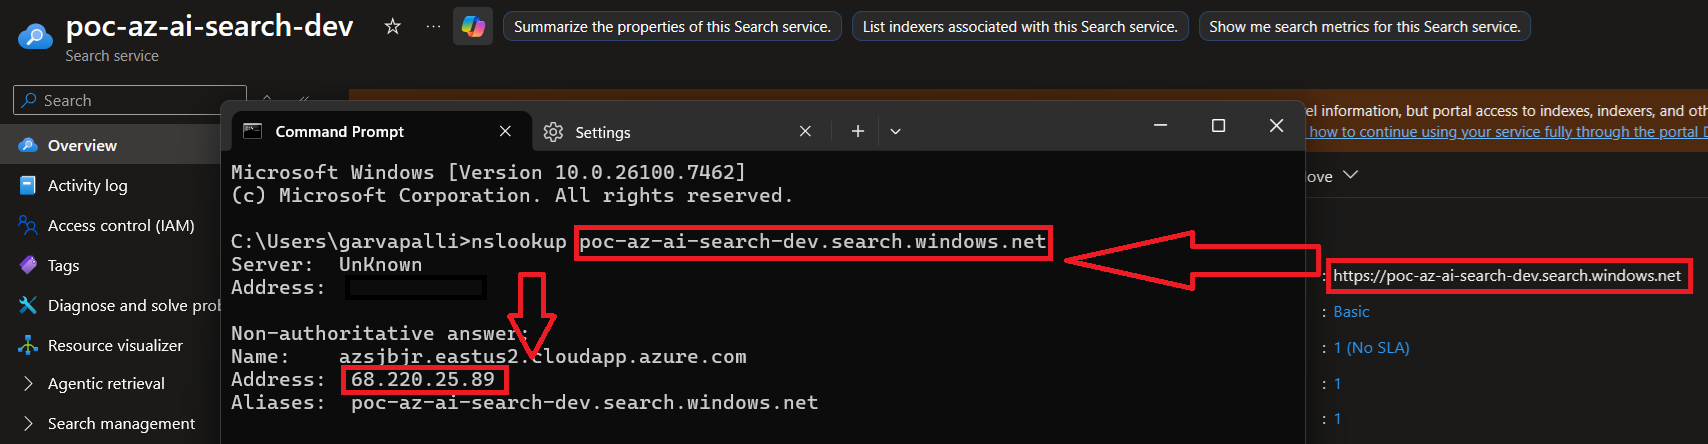
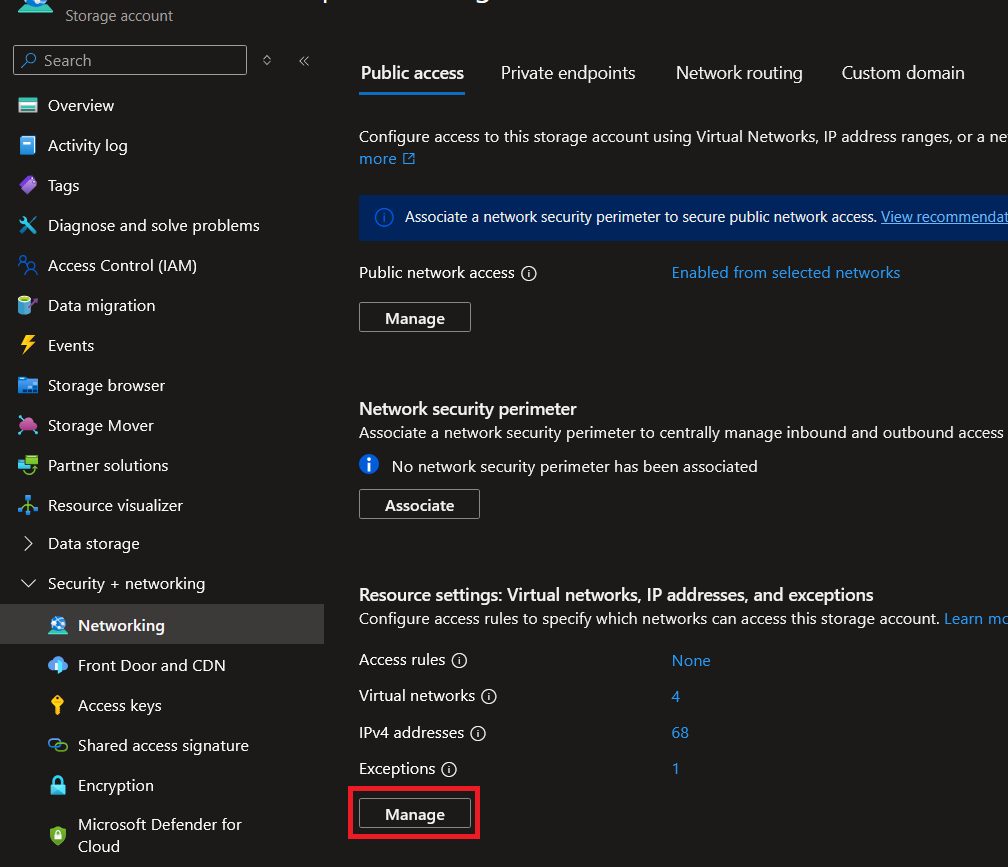
- To allow the import wizard to access the right resources, you need to go through a few steps. First add the public IP of your Azure AI Search instance to your Storage Account's firewall. You can get this value by checking the Overview page on your Azure AI Search and performing an
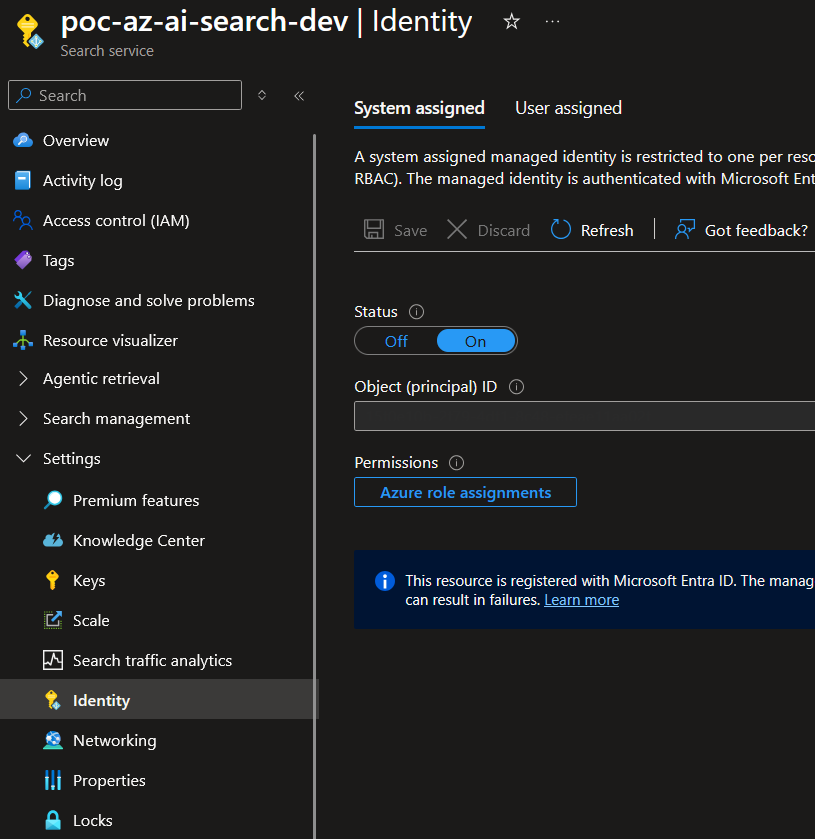
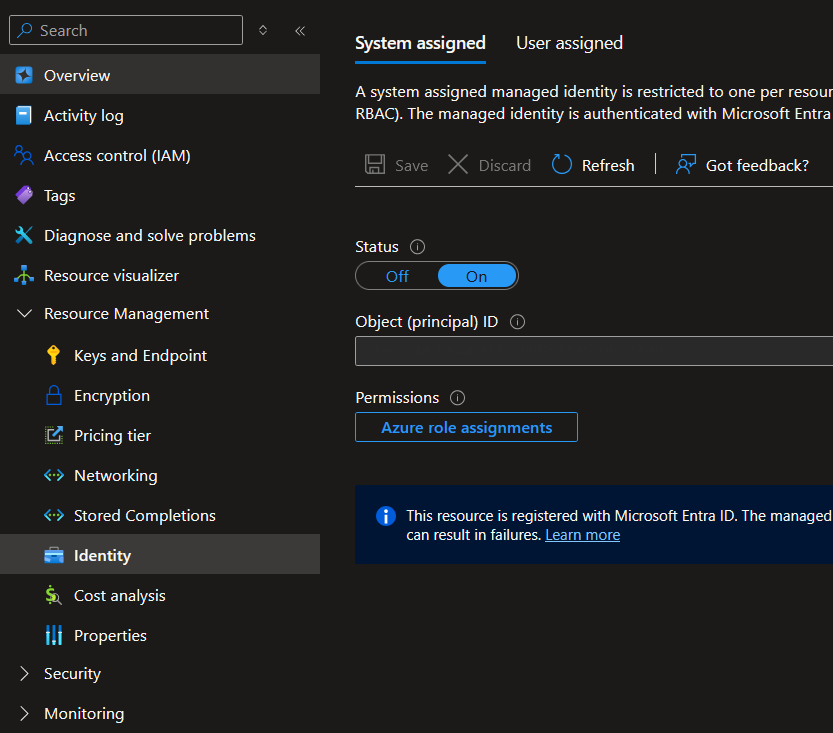
nslookupon it in your terminal: - Next, enable a System-assigned Identity for your Azure AI Search instance on the Settings > Identity page on the left sidebar. Do the same for your Azure AI Foundry, which will be under Resource Management > Identity instead:
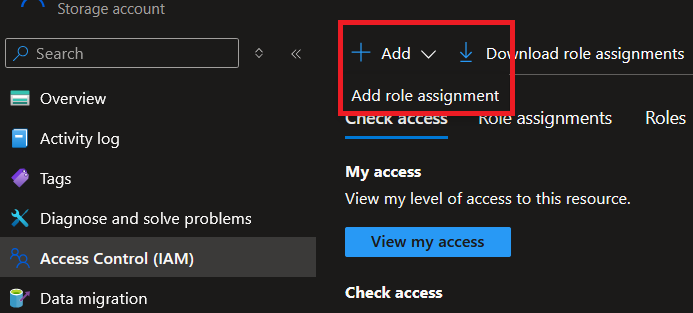
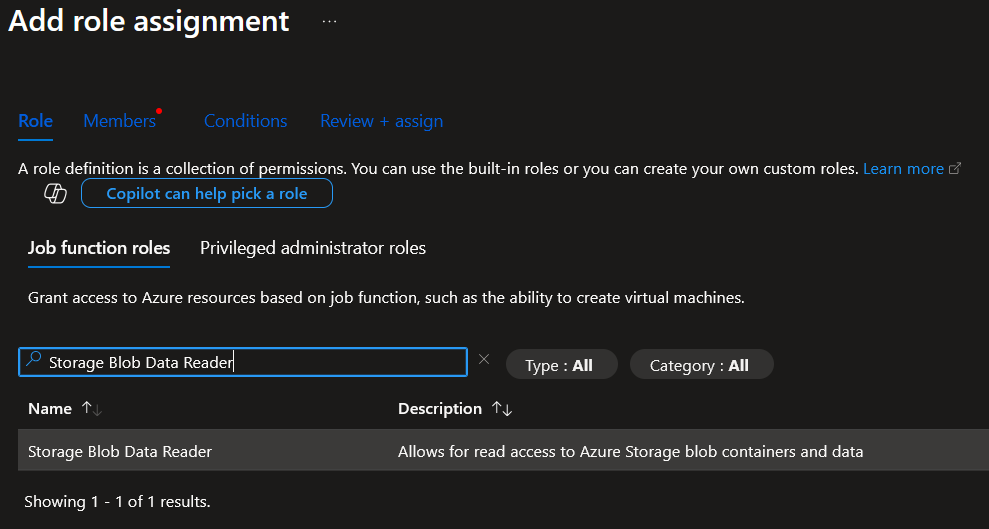
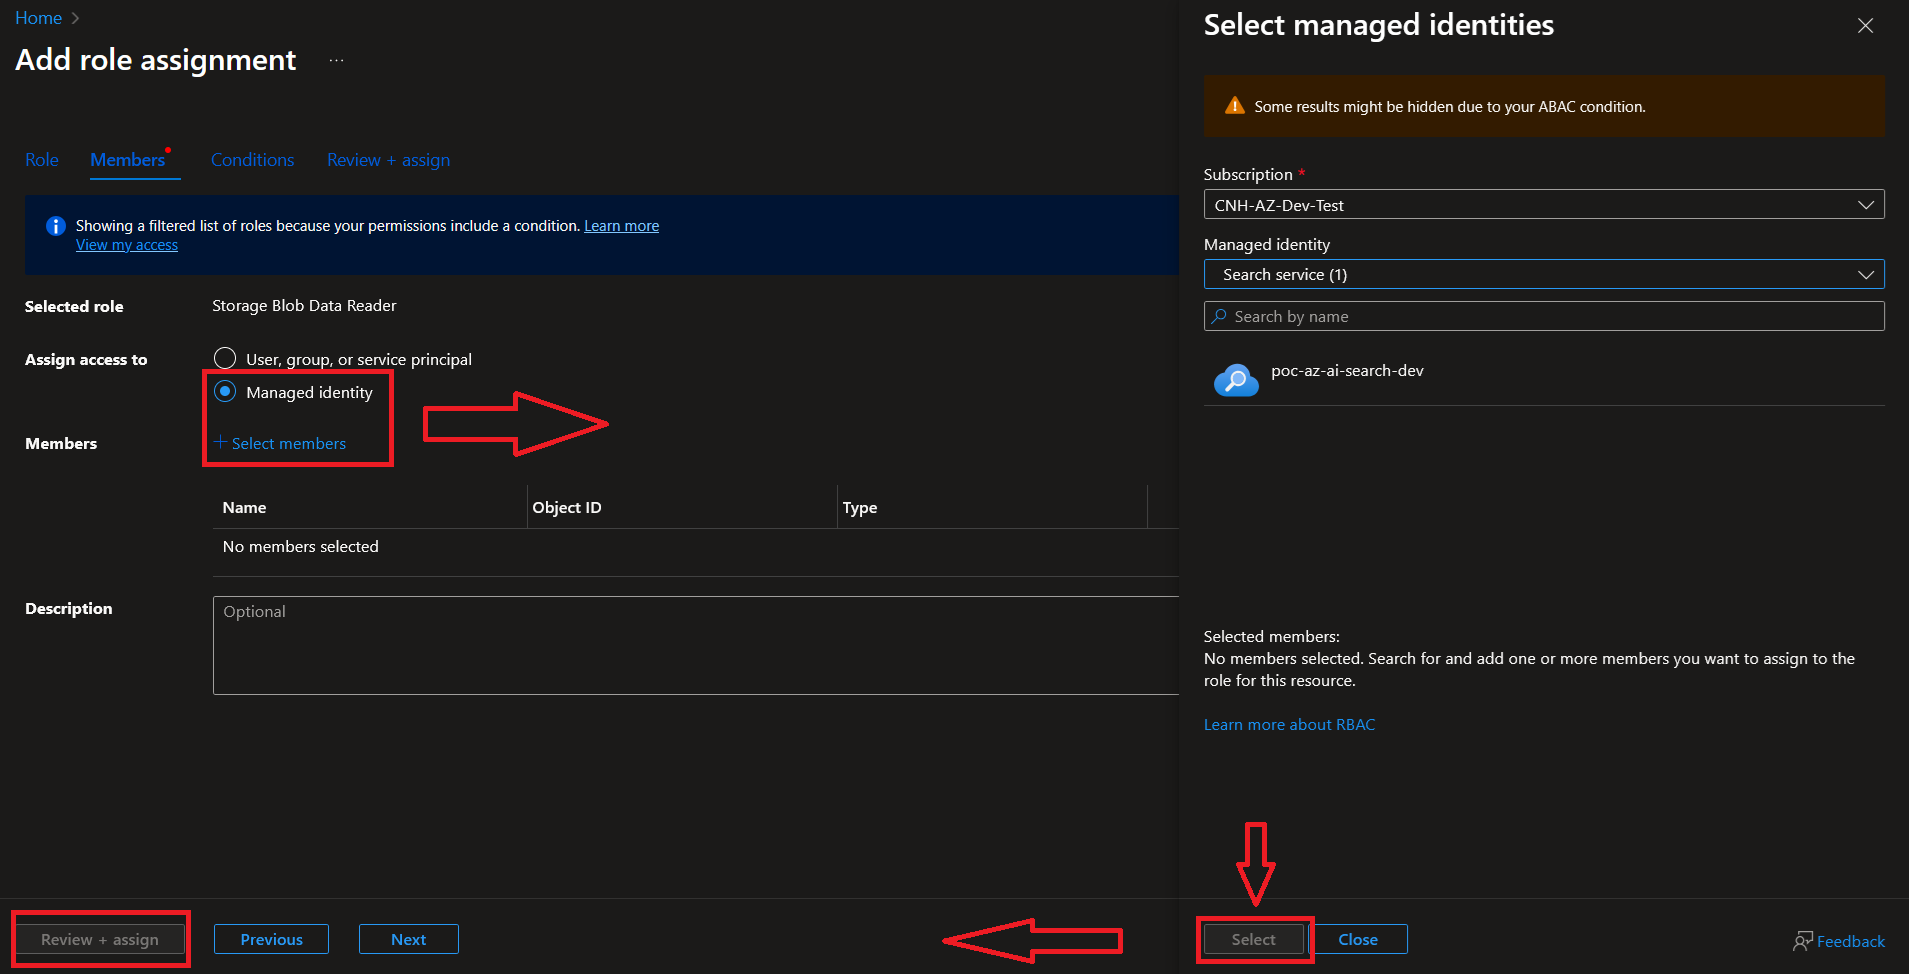
- In your Storage Account on the Access Control (IAM) page, click Add > Add role assignment and find the Storage Blob Data Reader role. Click it, then hit next. On the Members page, select Managed identity and click "+ Select members" and find the Search service managed identity. Click Select, and "Review and Assign" at the bottom of the page after you are done.
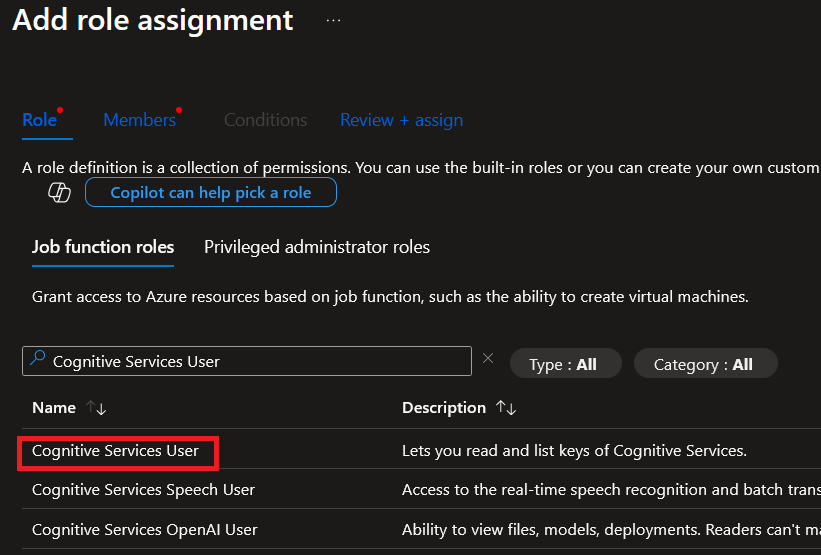
- You will need to go through the exact same process on your Azure AI Foundry, except the name of role is "Cognitive Services User"
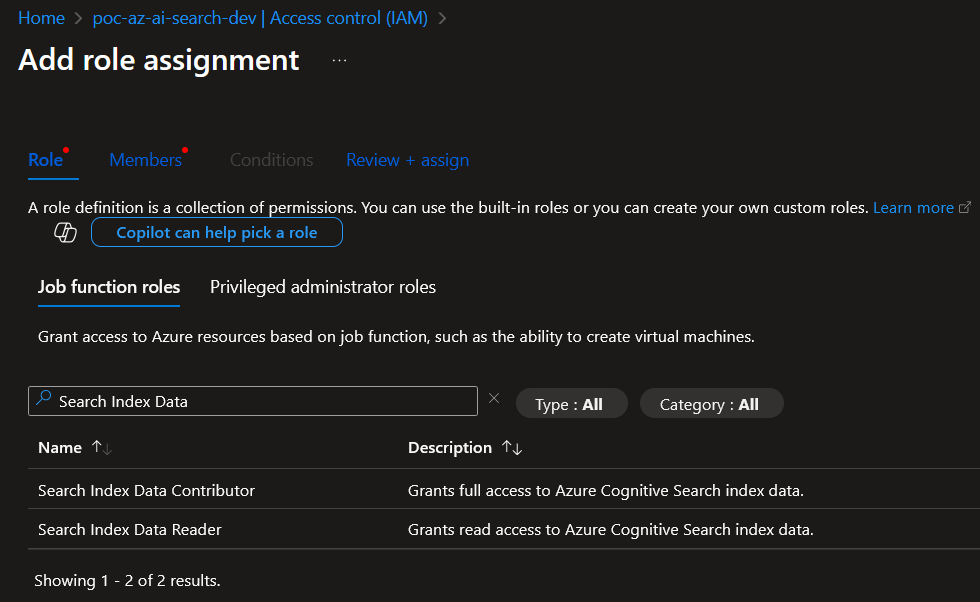
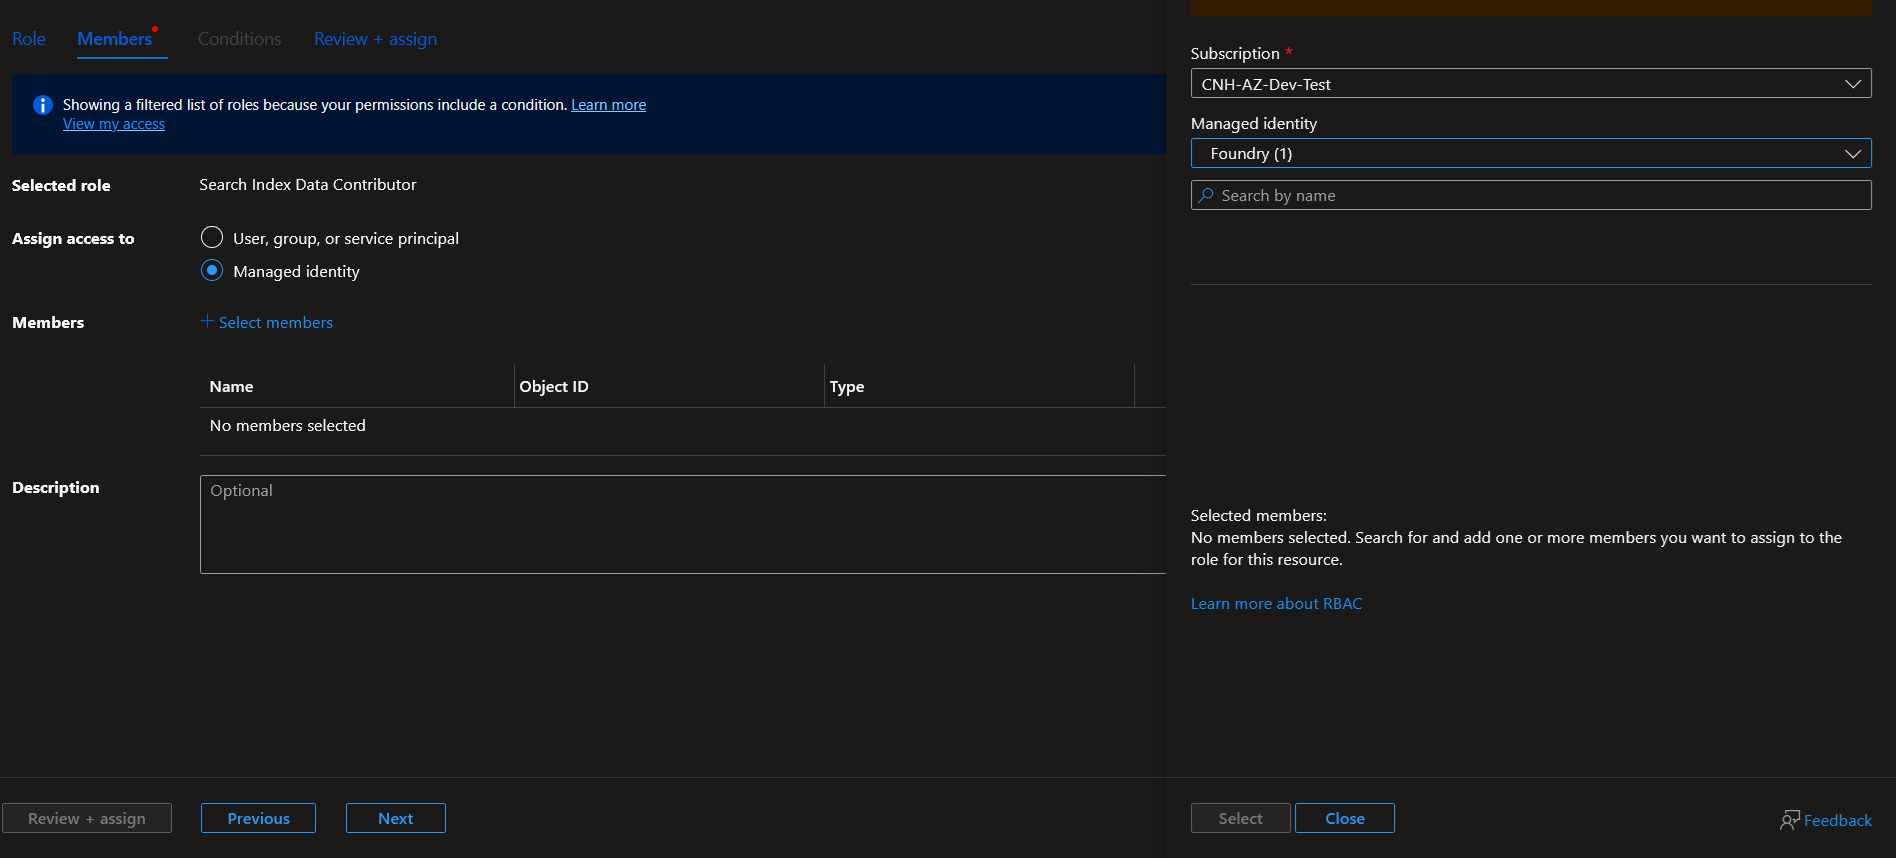
- Finally, on your Azure AI Search instance, go through the same process, except add the "Search Index Data Reader" and "Search Index Data Contributor" roles for your Azure AI Foundry managed identity:
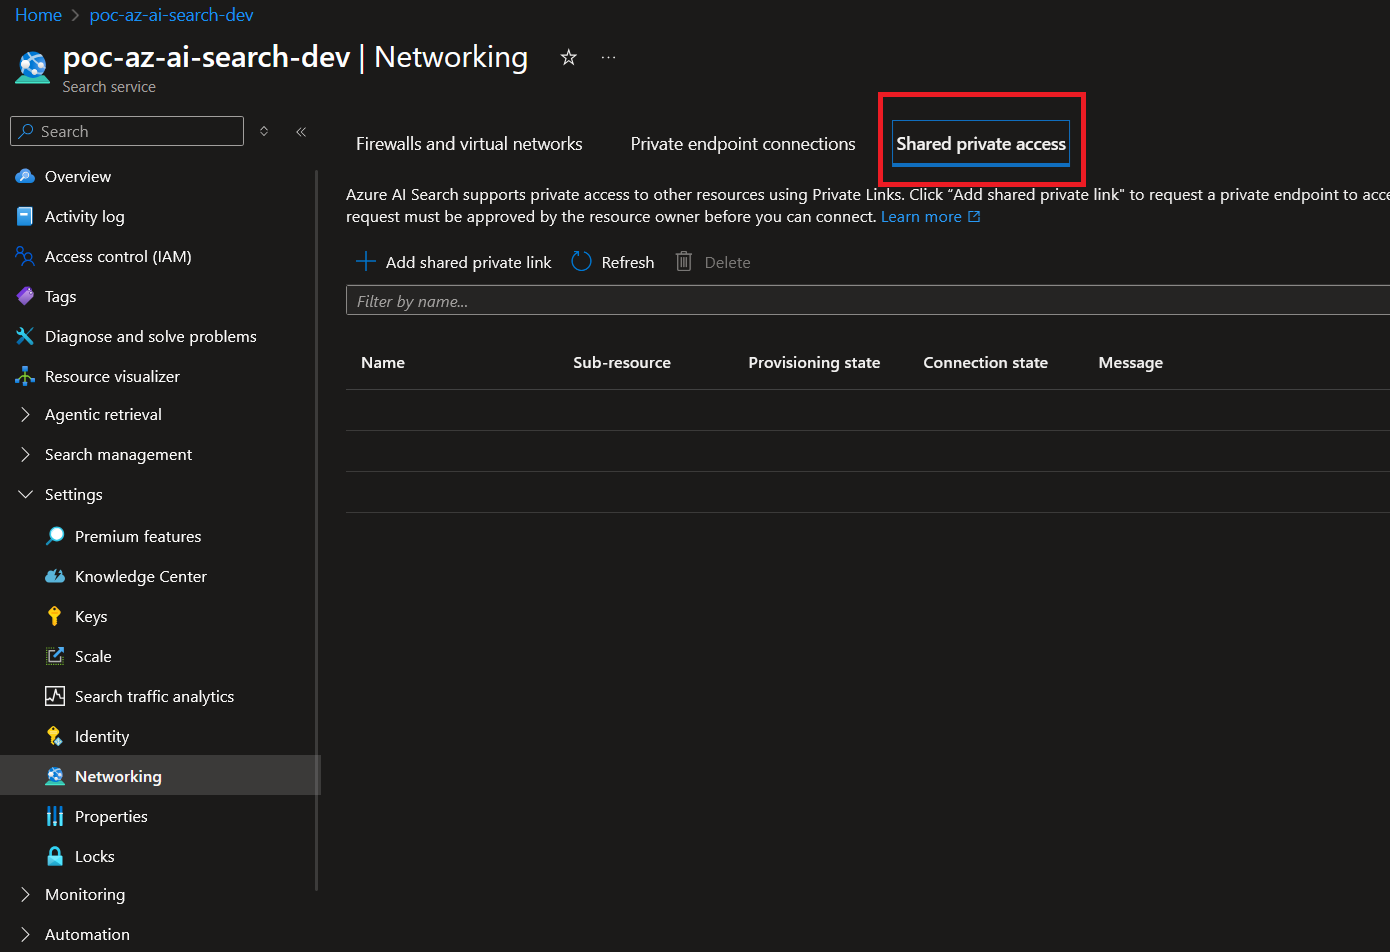
- In your Azure AI Search instance, go to Settings on the left sidebar, then click Networking. At the top of this page, click "Shared private access":
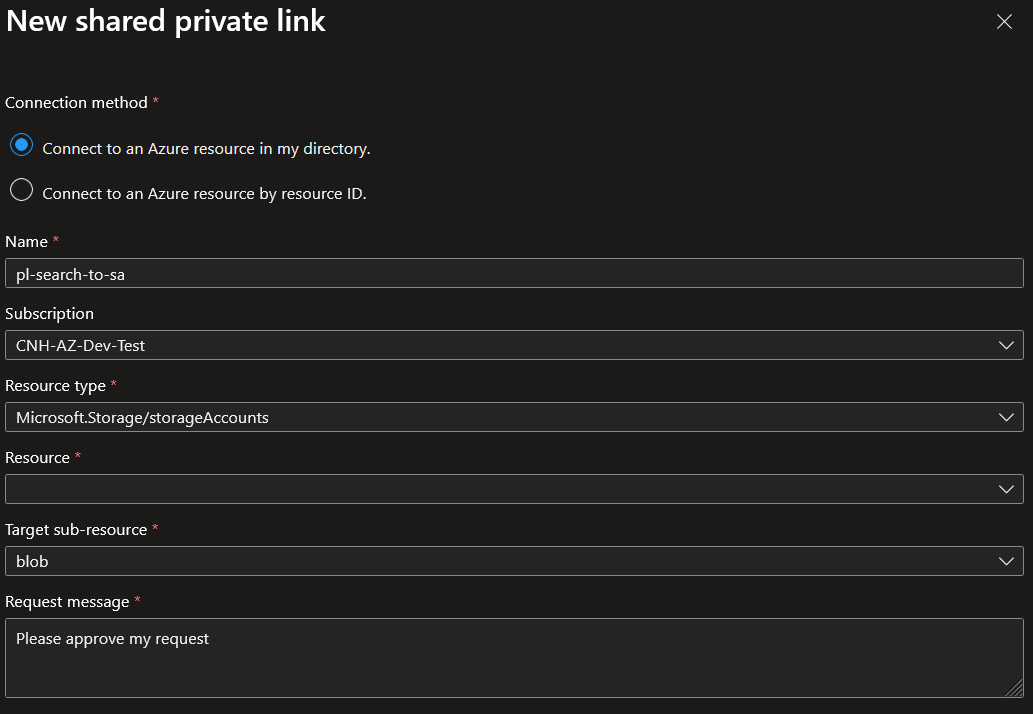
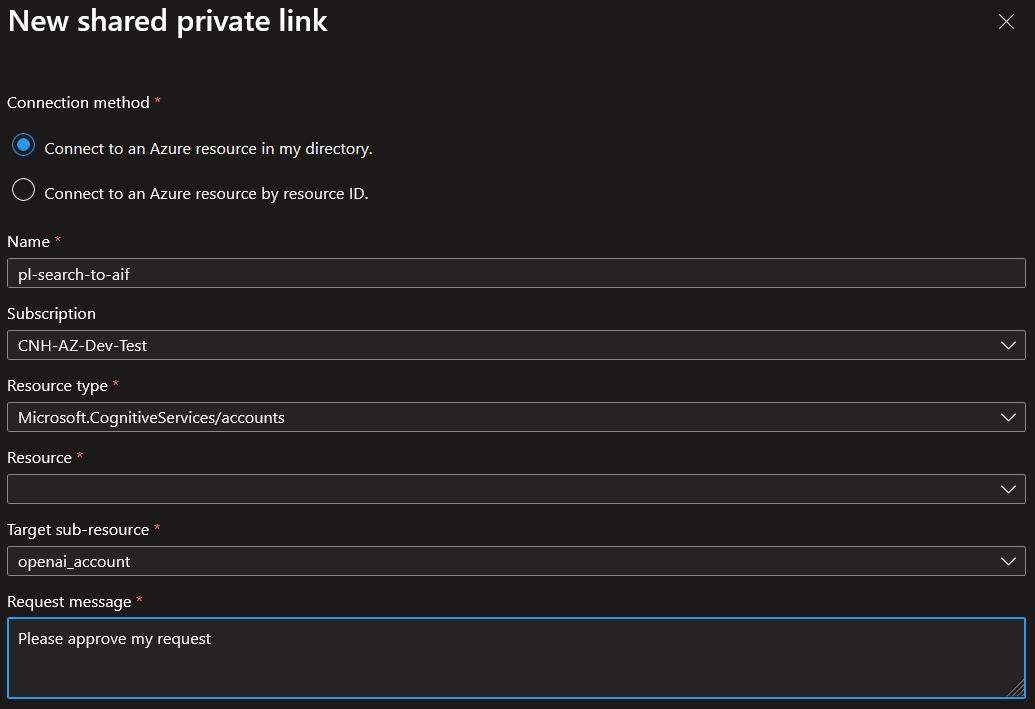
- You need to create two private access links here: one for the storage account where your documents are stored, and one for your AI Foundry instance. Click "Add shared private link" and fill in the details:
- Storage Account:
- AI Foundry (add both the
openai_accountandcognitiveservices_accountsub-resource targets as separate private links):
- Storage Account:
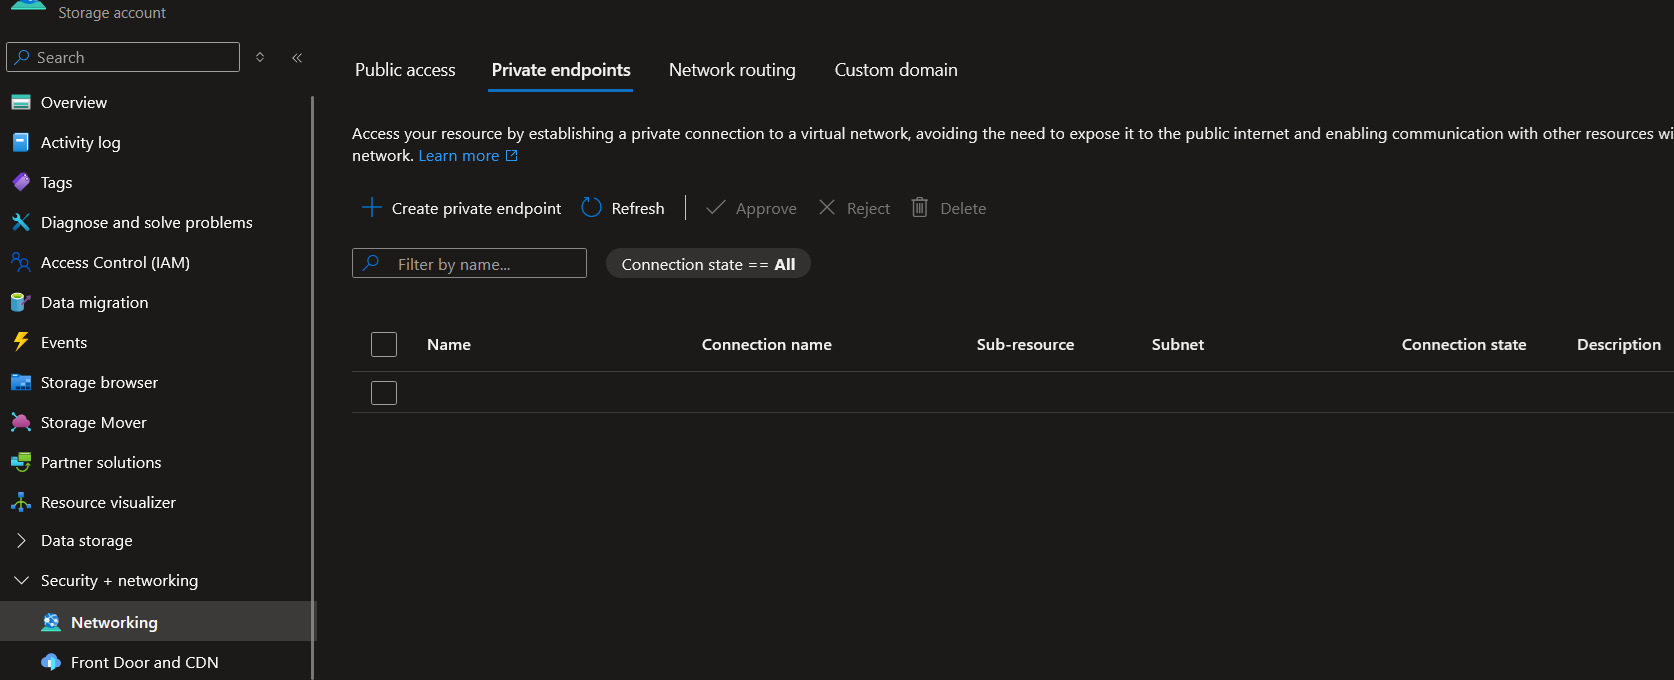
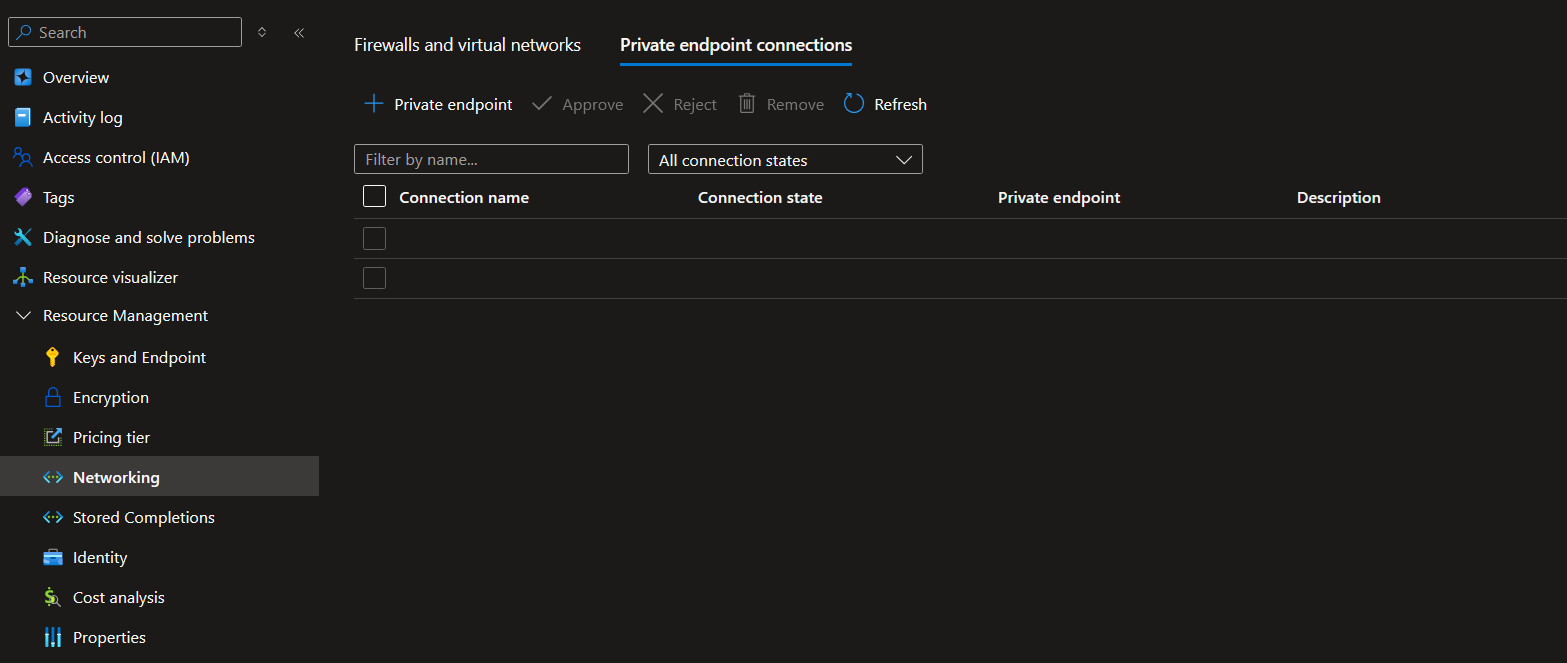
- On your Storage Account and AI Foundry pages, navigate to the page where private endpoint connections are managed and approve the requests:
- Storage Account
- AI Foundry
- Storage Account
Part 2: Importing Data with the Wizard
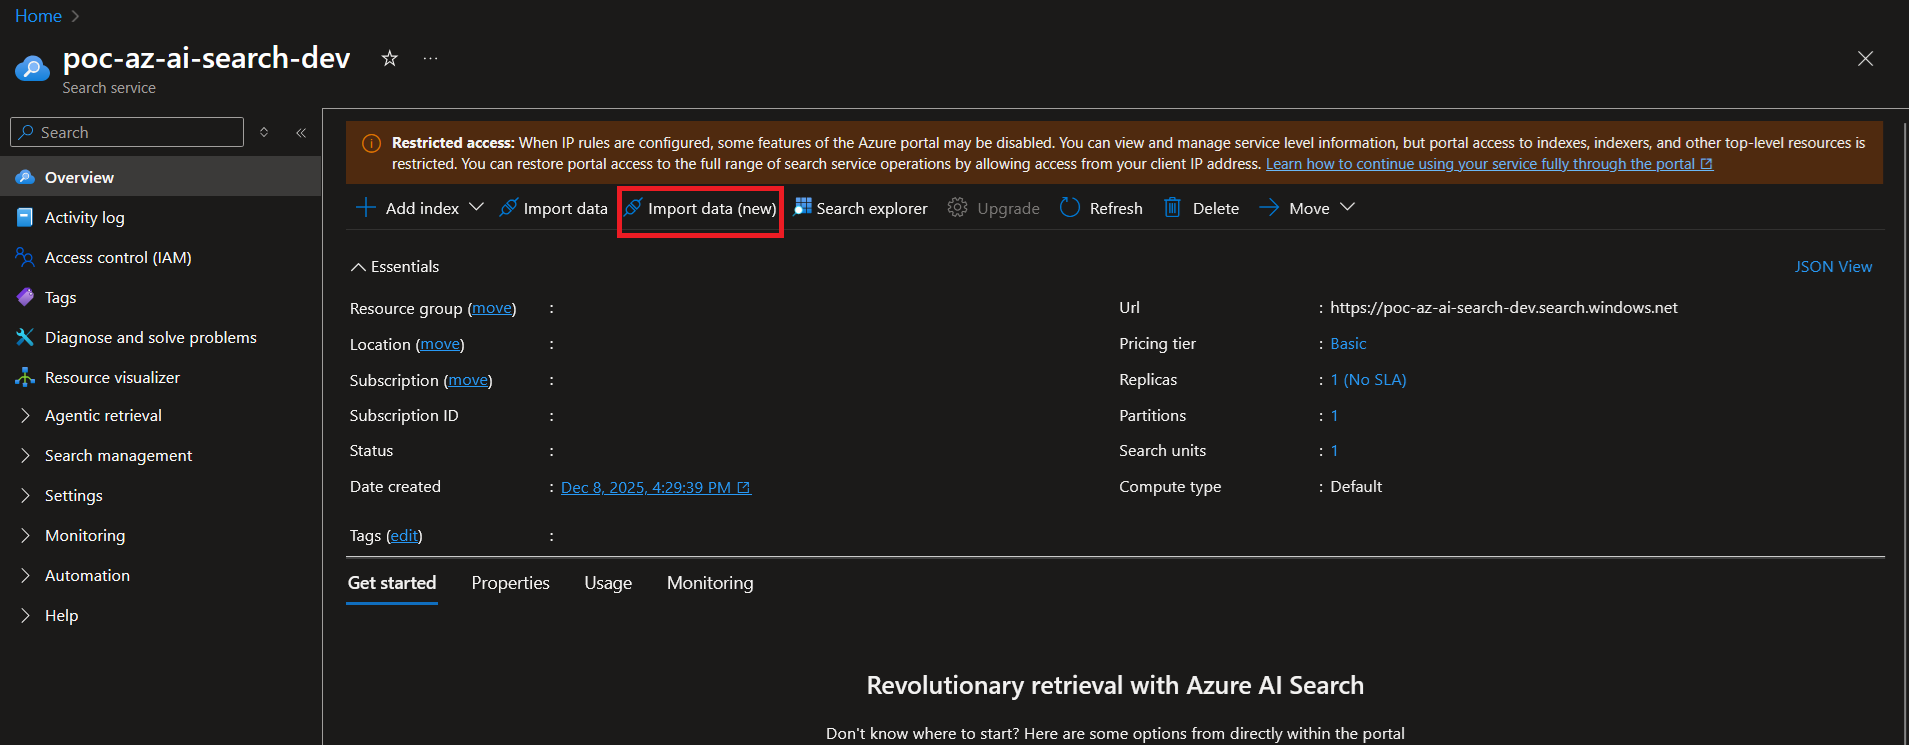
- On the Azure AI Search Overview page, click the "Import data (new)" button:
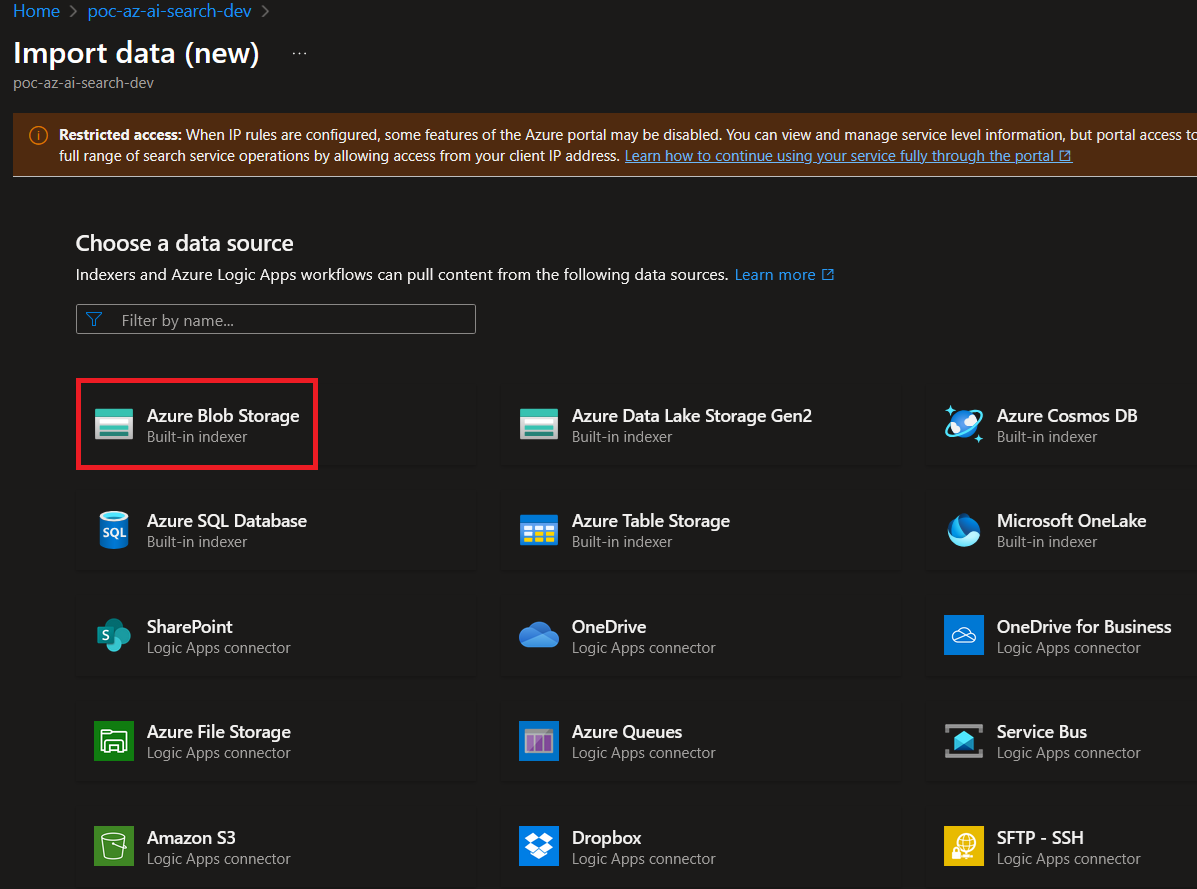
- There will be many different data source options on the next page. For us, we will choose Azure Blob Storage:
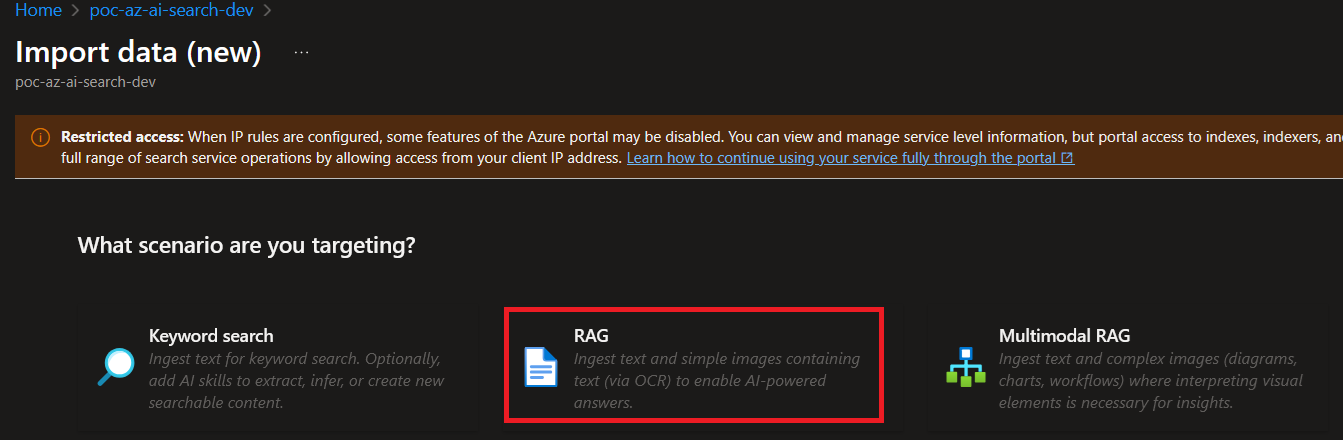
- As none of our documents include complex images (defined by the wizard as "diagrams, charts, and workflows"), we will choose the basic RAG option:
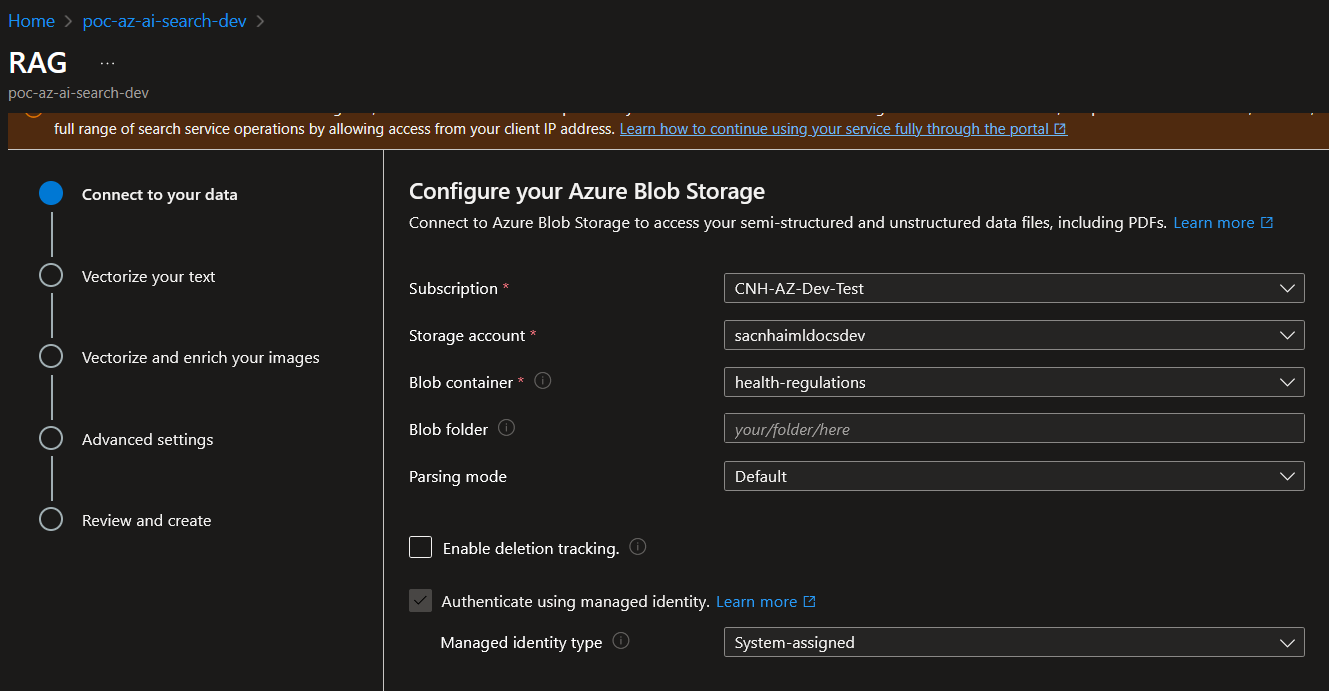
- Fill in the details that specify where your Blob Container is located with the path to your files:
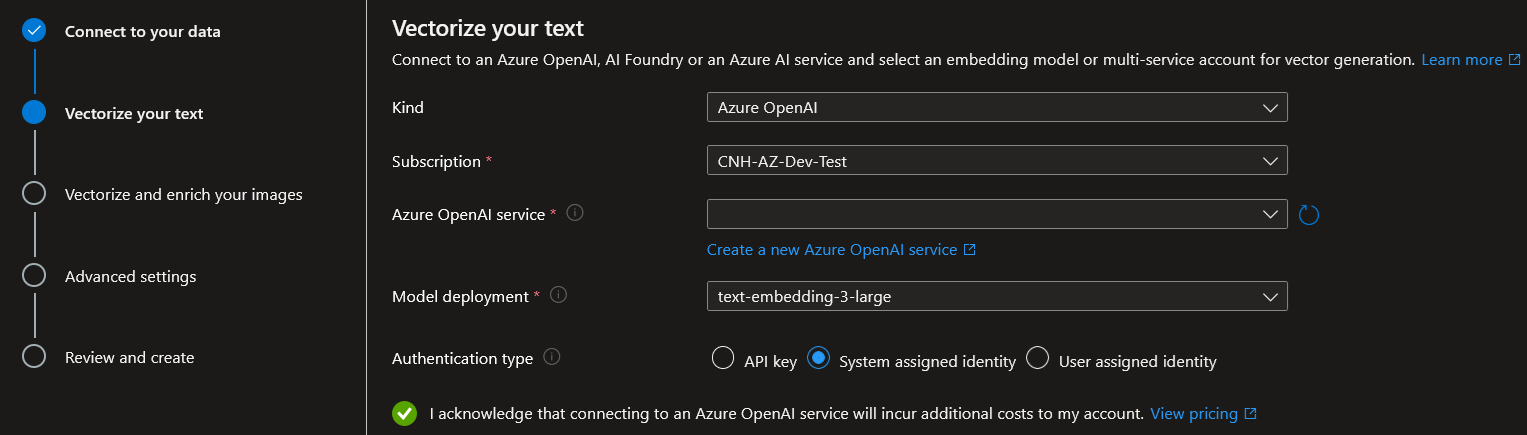
- Select your AI Foundry resource and the embedding model you set up earlier:
- For this tutorial, we will skip the vectorization/enrichment step as we do not have many images and none that require description. If we did, we would use the Multimodal RAG workflow instead as it is much more powerful.
- On the next page, check the "Enable semantic ranker" box to enable agentic retrieval.
- Keep the Schedule value as "Once" for this tutorial. In the future, this can be changed to keep documents up to date based on changes to files in the Blob Container on a daily, weekly, etc. basis. Do a final check to make sure the default index setup looks correct.
- Give your RAG system a coherent name on the next page and review that all the information appears to be correct. Click "Create".
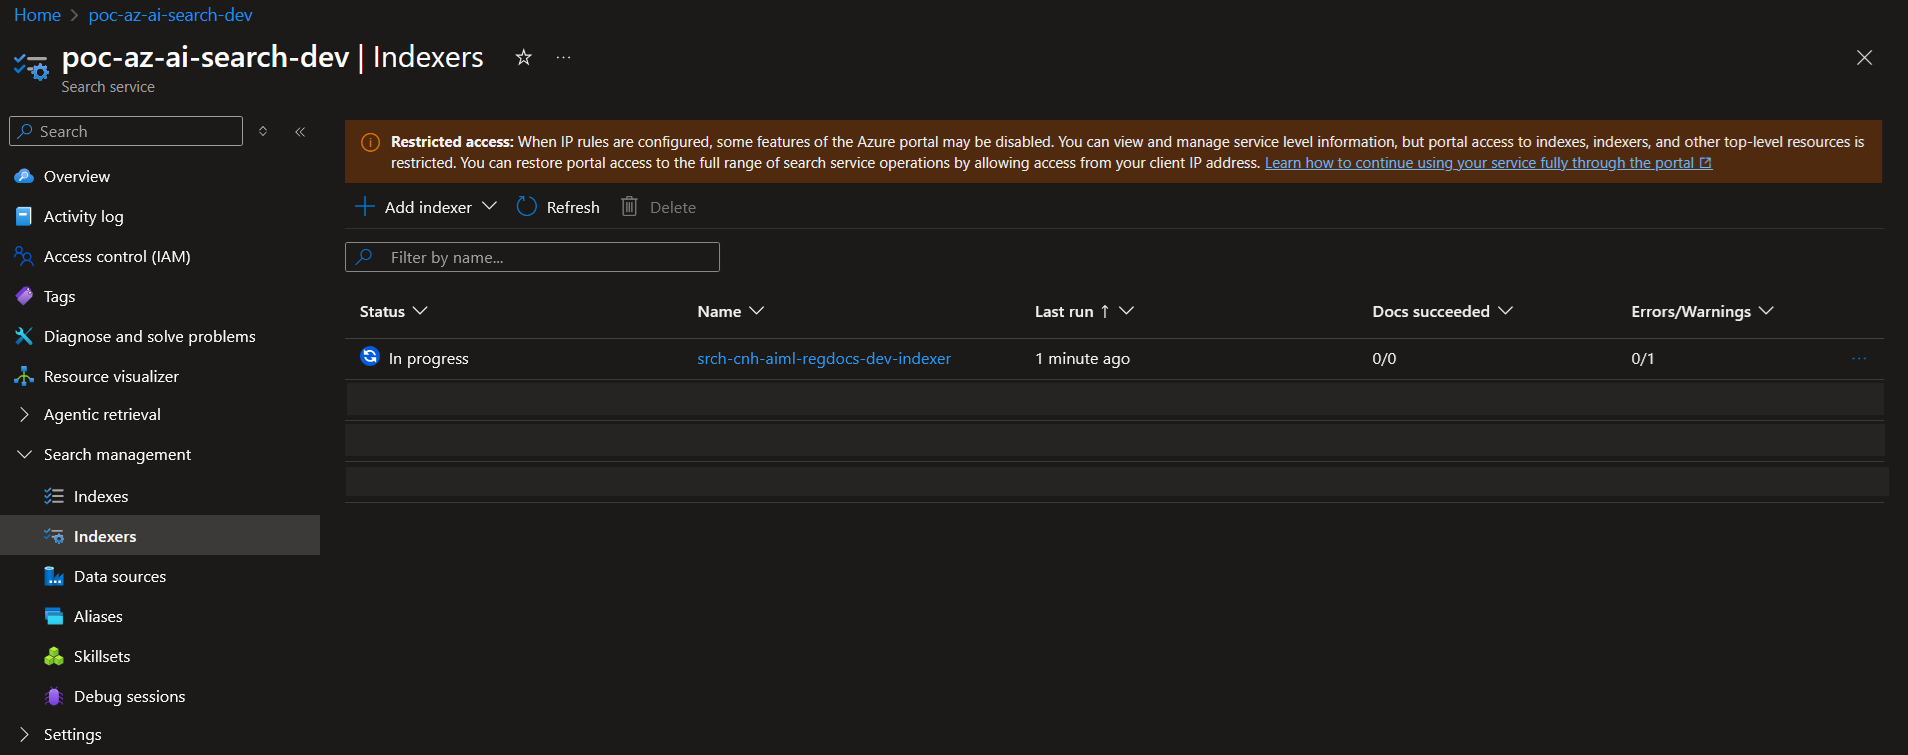
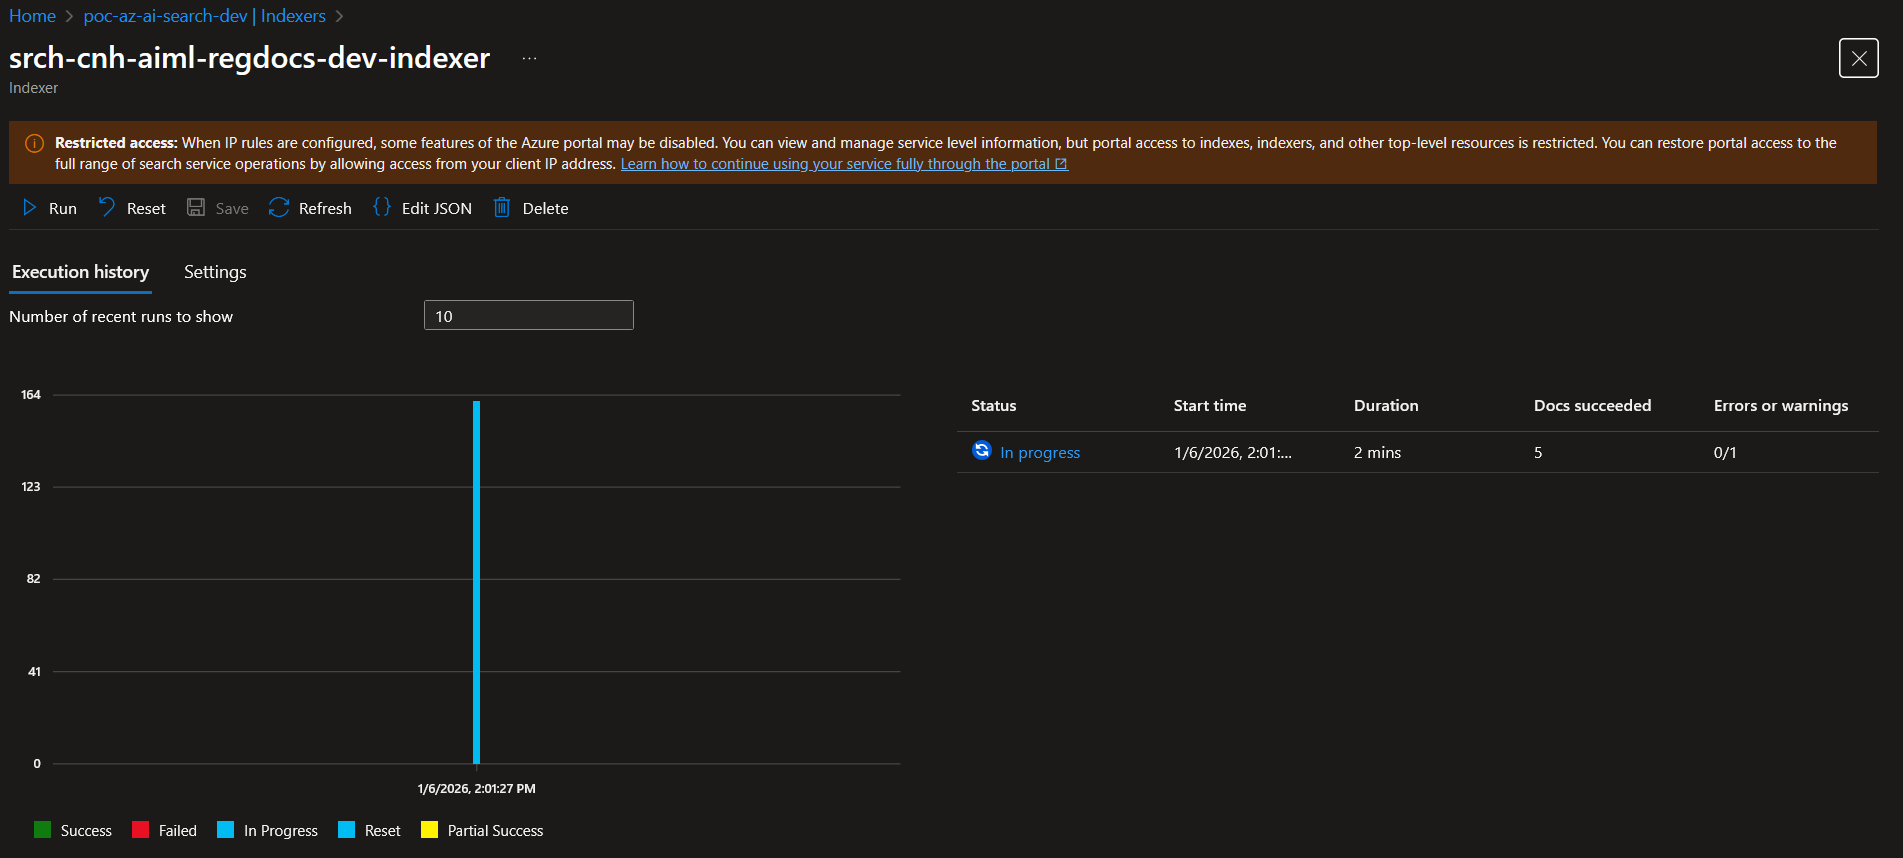
- At this point, you will need to wait for some time to allow the indexer to finish running on the documents in the Blob Container. You can check the status at any time on the corresponding indexer's page. It will be prefixed by the name you gave your RAG system on the previous step:
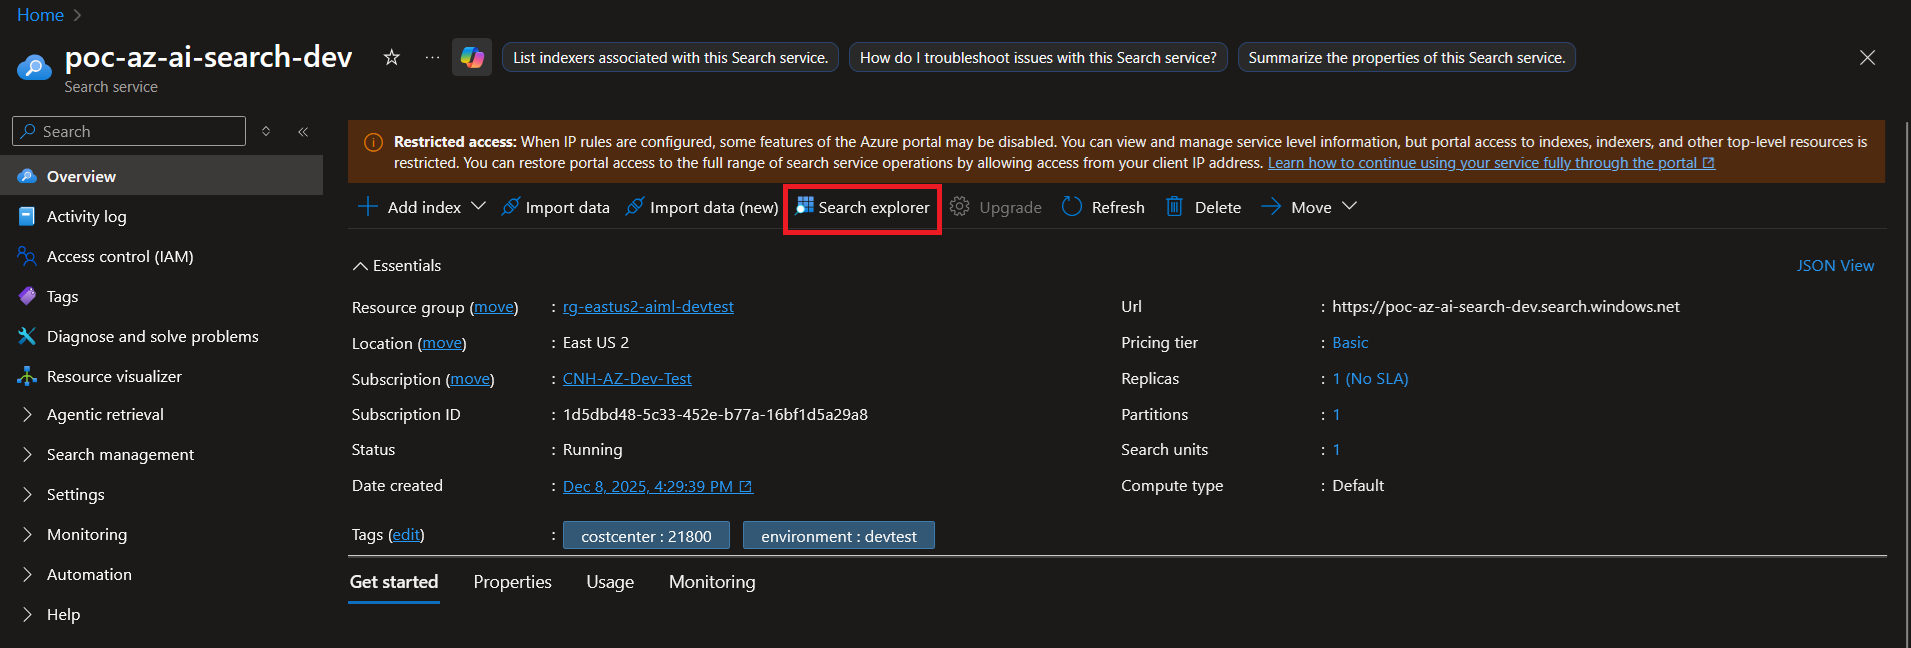
- After the process completes, go back to the Overview page of your Azure AI Search Instance and click "Search explorer" in the top row:
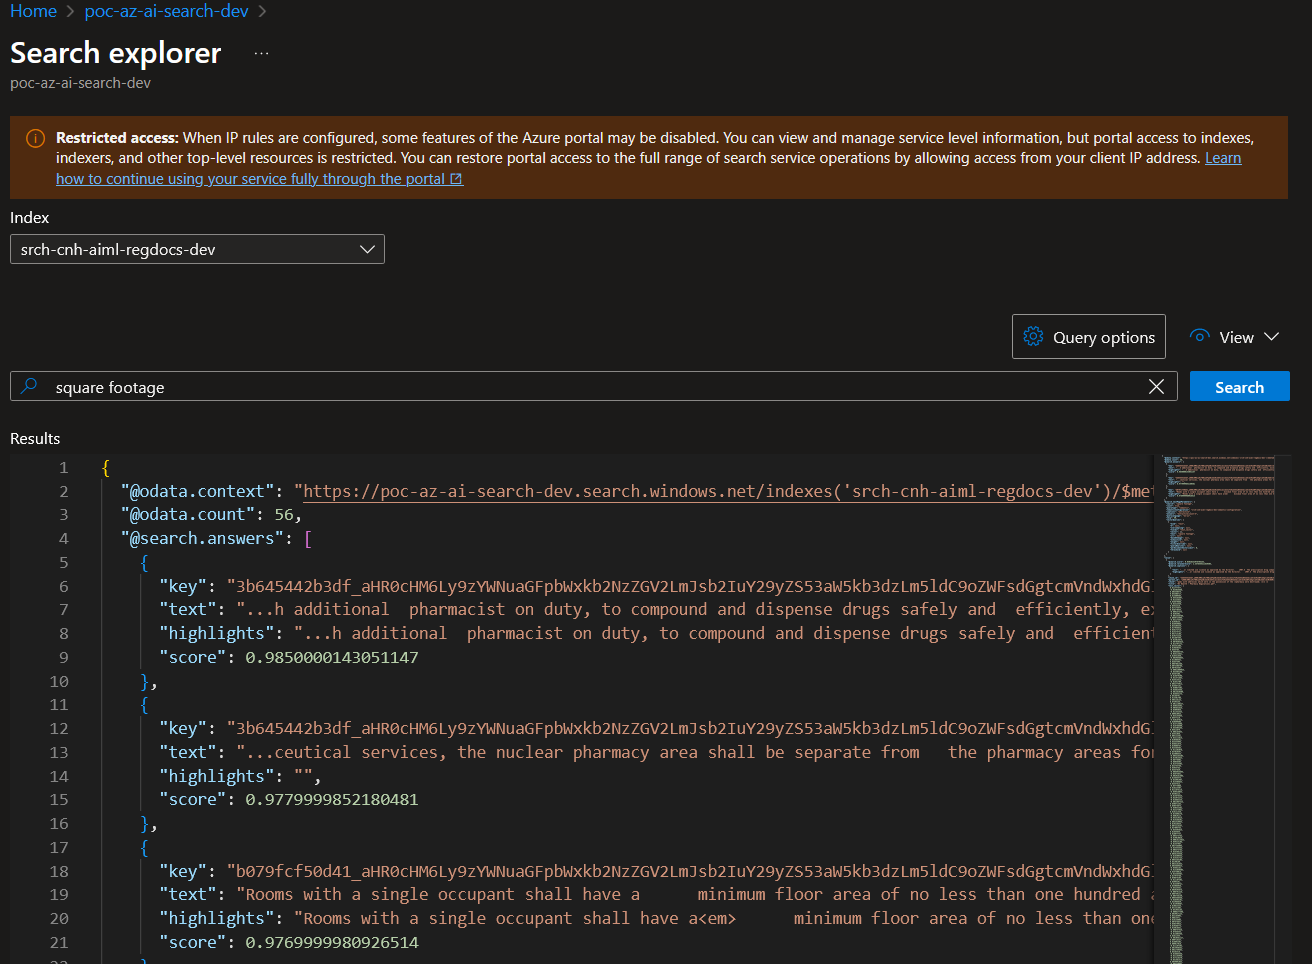
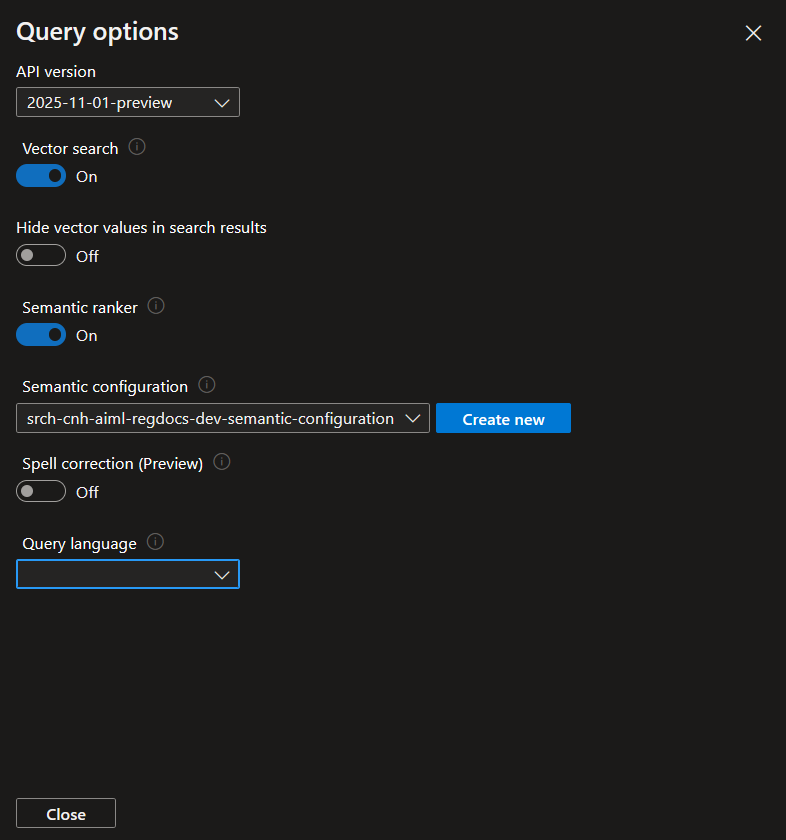
- From here, you can choose your index to query (prefixed by the name you gave your RAG system) and choose your query options to retrieve results!
Security Considerations
The wizard relies on having access to resources over the public internet. To protect resources, consider turning off private endpoints initially and keeping public access open with an IP-based firewall. Ensure that they allow the public IP of the Azure AI Search service in the allow list. You can find this by doing an nslookup on the domain associated with the service. Also make sure the Azure resource in question allows trusted Microsoft services to communicate with it. If anything is broken in terms of connectivity or permissions, you get the generic error: "Access denied due to Virtual Network/Firewall rules.".
Private endpoints can be turned on after the wizard has run once. From that point on, all the connections will be over the shared private links.
An example of how to set up Azure AI Search without relying on the wizard will be published in the future!